Purpose of this Release
This is a supplemental release for
the following products: Microsoft ® Windows ® XP Home Edition and
Microsoft ® Windows ® XP Professional
This supplement contains the following: Microsoft ® Windows Media
Player 9 Series and Windows ® Movie Maker 2
This document describes how original equipment manufacturers (OEMs) can
install Microsoft® Windows Media® Player 9 Series and Microsoft Windows®
Movie Maker 2.0. It also lists steps for customizing these installations.
The following topics are covered:
- Adding Windows Media Player 9 Series to a preinstallation of Windows
XP
- Adding Windows Movie Maker 2.0 to a preinstallation of Windows XP
- Adding Windows Media Player 9 Series and Windows Movie Maker 2.0 to
a preinstallation of Windows XP.
- Customizing Windows Media Player 9
Series
Skip
instructions and go to downloads
Adding Windows Media Player 9 Series to a Preinstallation of Windows
XP
There are 3 methods for installing Windows Media Player 9 Series on
preinstallations of Windows XP. For additional details about Windows
preinstallations, see the Windows XP Original Equipment Manufacturer
Preinstallation Kit (OPK).
Method 1 - Use Setup Manager
To install Windows Media Player 9 using Setup Manager, follow these
steps:
- Copy the Media Player 9 setup package to the Technician machine
under the OPKTools folder. You can create a subdirectory to hold the
executable if you wish. For example, c:\opktools\Apps\WM9.
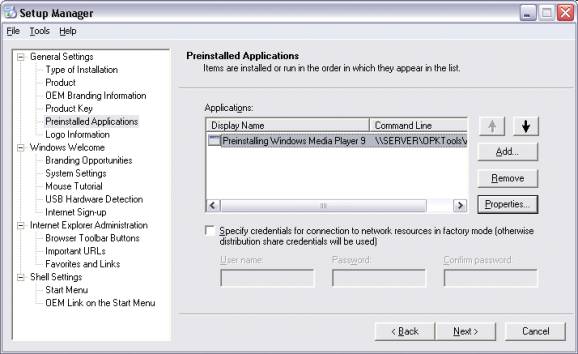
- Create (or edit an existing) configuration set.
- On the "Preinstalled Applications" wizard screen, click the Add
button; the Add Application dialog appears.
- Type a Display name for the application. For example use,
"Preinstalling Windows Media Player 9".
- Next, browse for the name of the setup command by clicking the
Browse button.
- Navigate to the location where you copied the Media Player 9 setup
package in step #1 and select the executable in the window, then click
Open. The command will be added to the Add Application dialog.
- On the Add Application dialog, enter the following in to the command
line arguments edit box exactly as shown:
/Q:A /R:N /c:"setup_wm.exe /Q /R:N /NoPID
/DisallowSystemRestore /P:#e"
Note: The quotation marks (") after /c: and following
/P:#e are required or the application will not
install.
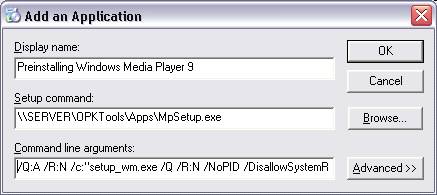
- Click the OK button and the application will be added to the
configuration set:
Method 2 - Reference system / sysPrep
- Create a reference Windows XP computer that has Windows Media Player
9 Series installed.
- Use Sysprep.exe on the reference computer to prepare Windows for
imaging.
- Image the reference computer using an imaging utility.
- Restore the reference image to the target computers.
Method 3 - Network installation
- Create an OEM distribution folder as described in the Windows XP OPK
documentation, and then do the following:
- Copy the Windows CD to a shared folder.
- Create a folder named
$OEM$ in the i386 directory.
- Create a folder named $$ in the $OEM$
folder.
- Copy the Windows Media Player executable file (MPsetup.exe) to the
$$ folder in the OEM distribution folder ($OEM$).
- Create a batch file named Wmp.cmd in the $$ folder by typing the
following command in the command prompt:
"mpsetup.exe /Q:A /R:N /c:"setup_wm.exe /Q /R:N /NoPID
/DisallowSystemRestore /P:#e"
Note: It is important to use the previous command-line command
for proper silent installation of MPsetup.exe in the OEM preinstallation
scenarios.
- Create an Answer file with at least the following sections and
values.
[Unattended]
OemPreinstall = YES
[GuiRunOnce]
"%windir%\wmp.cmd"
[GuiUnattended]
AdminPassword = ""
AutoLogon = Yes
AutoLogonCount = 1
- Use the Answer file with a network-based Windows setup from the
folders created in steps 1 through 3.
*** IMPORTANT ***
Do not use Windows Media
Player 9 Series, acquire digital rights management (DRM) licenses, play
protected DRM content, or copy CDs with DRM protection enabled prior to
running Sysprep.exe on the reference computer unless you are running the
Windows 2000 Service Pack 4 (SP4) or Windows XP Service Pack 2 (SP2)
versions of the Sysprep utility. The current version of Sysprep does not
remove acquired licenses properly and does not restore Windows to a
"clean" state. Performing any of these actions without using the updated
version of Sysprep is unsupported.
There are hot fixes available for Sysprep.exe and Riprep.exe, described
in the Microsoft Knowledge Base article Q812812, that provide updated
versions of Sysprep.exe and Riprep.exe. These updates will be included
with Windows 2000 SP4 and Windows XP SP2. Any future service pack release
of the Windows OPK tools will supercede this hot fix version of Sysprep
and Riprep.exe You should update to the final service pack release of the
OPK tools once they are available.
Adding Windows Movie Maker 2.0 to a Preinstallation of Windows XP
In the Windows XP preinstallation kit, there is an additional package
that may be used to install Windows Movie Maker 2.0. To install only
Windows Movie Maker 2.0, use the Setup.exe package found in the MM2 folder
under the various language folders.
Use the following command line options when running setup.exe to invoke
an unattended mode setup. "Setup.exe /Q:A /R:N" (without the quotation
marks)
Adding Windows Media Player 9 Series and Windows Movie Maker 2.0 to
a Preinstallation of Windows XP
In the Windows XP Windows Media Player 9 Series and Movie Maker 2.0
preinstallation kit, there are additional packages that may be used to
install both Windows Media Player 9 Series and Windows Movie Maker 2.0 in
one install.
WMP9_MM2.exe found under the WMP9_MM2 folder on the CD
installs both Windows Media Player 9 Series and Windows Movie Maker 2.0.
It defaults to a silent installation with no user interface. It requires
no additional command-line parameters when invoked.
Customizing Windows Media Player
You can do the following to modify the Windows Media Player
installation:
+ Provide one or more custom visual styles, or "skins."
+ Configure
Windows Media Player to use your custom skin as the default.
+ Set
Windows Media Player as the default for automatically playing DVDs (DVD
AutoPlay).
+ Enable MP3 encoding in Windows Media Player.
+ Remove
visible entry points to Windows Media Player, as specified in the
"Removing Access to Windows Components" topic of the Windows OPK.
Designing Custom Skins for Windows Media Player
A skin is a customized user interface that overlays Windows Media
Player when the player is in skin mode. To see Windows Media Player in
skin mode, start the Player and press CTRL+2. Windows Media Player is
available with many skins that users can choose from, and you also can
develop and distribute your own skins. For more information about creating
skins, see the Windows Media Player Software Development Kit (SDK) at the
MSDN® Web site (http://%20msdn.microsoft.com/windowsmedia/).
For cobranding opportunities, send an e-mail message to wmpoem@microsoft.com.
To make custom skins available in Windows Media Player
Create a skin as described in the Windows Media Player Software
Development Kit. Copy the skins to the %systemdrive%\Program
Files\Windows Media Player\Skins folder, where %systemdrive% is the
drive that contains the Windows installation files.
To set the default skin for Windows Media Player:
Create a skin, as described in the Windows Media Player Software
Development Kit. Copy the skin to the %systemdrive%\Program
Files\Windows Media Player\Skins folder, where %systemdrive% is the
drive that contains the Windows installation files. On the destination
computer, use Registry Editor or another registry editing tool to open the
registry.
Caution: Incorrectly editing the registry may severely damage
your system. Before making changes to the registry, you should back up any
valued data on the computer.
Set the value of
HKEY_LOCAL_MACHINE\Software\Microsoft\MediaPlayer\Preferences\OEMSkin
to the file name of your skin (for example, Oem.wmz).
Setting Windows Media Player as the Default DVD Player
If another program is already installed and set as the default playback
program for DVDs, you can edit the registry to specify Windows Media
Player as the default player for DVDs.
To set Windows Media Player as the default DVD player:
On the destination computer, use Registry Editor or another registry
editing tool to open the registry.
Caution: Incorrectly editing the registry may severely damage
your system. Before making changes to the registry, you should back up any
valued data on the computer.
Set the value of HKEY_CLASSES_ROOT\DVD\Shell\Play\Command to
"%systemdrive%\Program Files\Windows Media
Player\wmplayer.exe" /device:DVD "%L", where %systemdrive% is
the drive that contains the Windows installation files.
Enabling MP3 Encoding for Windows Media Player
Windows Media Player supports MP3 encoding. To enable the Windows Media
Player to encode MP3 files, you need to license an MP3 encoder, install
the encoder, and then change registry settings.
To set Windows Media Player for MP3 Encoding:
On the destination computer, use Registry Editor or another registry
editing tool to open the registry.
Caution: Incorrectly editing the registry may severely damage
your system. Before making changes to the registry, you should back up any
valued data on the computer.
Open the registry key
HKEY_LOCAL_MACHINE\Software\Microsoft\MediaPlayer\Settings\MP3Encoding
Set the following values:
DWORDLowRate
Value <datarate>
DWORD
LowRateSample
Value <Sample>
DWORD
MediumRate
Value <datarate>
DWORD
MediumRateSample
Value <Sample>
DWORD
MediumHighRate
Value <datarate>
DWORD
MediumHighRateSample
Value <Sample>
DWORD
HighRate
Value <datarate>
DWORD
HighRateSample
Value <Sample>
String
PreferredCodec
Value <codec name>
For example, to set the LowRate to 56 kilobits per second (Kbps), set
the following keys:
HKLM,"%KEY_WMP%\Settings\MP3Encoding","LowRate",0x00010001,56000
HKLM,"%KEY_WMP%\Settings\MP3Encoding","LowRateSample",0x00010001,24000
HKLM,"%KEY_WMP%\Settings\MP3Encoding","PreferredCodecName",,"A MPEG
Layer-3 Codec"
HKLM,"%KEY_WMP%\Settings\MP3Encoding","PreferredCodecPath",,"D:\WINDOWS\system32\aMP3codecfile.acm"
Note:
- Where ,"%KEY_WMP% = Software\Microsoft\MediaPlayer
- The value for PreferredCodec is limited to 255 characters.
Removing Windows Media Player Shortcuts
On Windows XP Service Pack 1 (SP1) and Windows 2000 Service Pack 3
(SP3) or later, you can remove visible entry points to Windows Media
Player. For examples of this, see the "Removing Access to Windows
Components" topic of the Windows XP SP1 OPK